Pajero flashing light fix
Free Pajero 4WD Flashing Light Fix and Troubleshooting
last updated 15th Sept. 2006
***Thank you for all the great comments, and suggestions however due to constant spam I have closed the comments section****
Many Pajero's (including Montero / Shogun variants ) owners at one time or another face is the dreaded 4x4 Super Select flashing light problem. It only takes a small amount of crud in the wrong place to upset the system so pays to acquaint yourself with it if you want to fix it yourself. (I understand that Super select is known as Active Trak in some models/countries).
NOTE: This article is based on a gen2.5 PETROL RHD vehicle, Also please note there are some differences between some models/engines - so your mileage may vary!
Flashing super select 4wd lights most often occur when the front differential automatic disconnect is not engaging /dis-engaging when you select/deselect 4x4 drive. Causes are:
- front differential sensor switch is damaged or faulty
- actuator rod/shaft jammed / seized (perhaps sand/mud/dirt)
- vacuum lines leak/popped off fittings
- vacuum solenoid valves (2no.) either maybe faulty
- electrical wiring connection issue (ecu/solenoids/switch)
- combination of the above
From the Montero / Pajero / Shogun forums it is clear that another common problem is flashing lights after repair work, for example after installing a new gearbox, or even a new radio.
Radio Installation
READERS TIP **** If you have just installed or repalced your radio/cassette/dvd player and you experience a new flashing light problem, check that you have not damaged or pulled a wire from the 4wd ecu (blue box) which is located just below the radio opening.
Other problems, for example the orange flashing light is also covered below.
How it works
It helps troubleshooting if you understand how the system should work. Pajero's have a four wheel drive system that allows the driver to engage 2 or 4wd, The rear differential is always driven, selecting 4wd engages the front differential free wheel, using a vacuum powered system.
The transfer gearbox (4wd) is mechanical (1998 GDI 3.5) so the selected gear is just that. Whatever the position of the transfer gearbox stick that is the gear you are in, it is a mechanical function.
The status of the system is indicated on the drivers console i.e. super select panel, however most often problems occur causing flashing lights, because there is a discrepancy between engaging/dis-engaging mechanism on the front differential and the transfer gearbox (t-case) gearstick position.
Lights
At ignition, in 2wd, the bottom pair of green lights are lite and stay lite constantly, because these lights are lite constantly, failure usually means a blown bulb(s).
The top pair of green lights flash briefly at startup but that is just an ECU start up check. If 4wd is properly selected and all the sensors are playing nicey, all four green lights are lite, and should not be flashing.
The main components of the system we need to look at are:
- super select light display
- Front differential
- Actuator
- Actuator shaft (and boot)
- Position sensor (the manual calls it the Free wheel engage switch)
- Vacuum control solenoid valves (x2)
- Vacuum piping (rubber and steel tubing)
- Vacuum tank (accumulator)
- 4WD ECU (electronic control unit)
- centre differential
- transfer gearbox
Troubleshooting
Most often the flashing light problem is an easy fix, primarily it happens because the 4wd system has not been regularly used. The 4wd must to be used regularly and exercised to keep it in good working order.
Assuming it's a Mk 1/2, the green lights are flashing because the system thinks that the front axle freewheel unit is still engaged and is trying to disengage it (or vice versa).
The system is operated via vacuum created by running engine (for petrol models) and is controlled by switches and electric solenoid valves. The solenoid valves on the bulkhead in front of the driver typically near the master cylinder. In turn they are connect to the actuator on the front axle by a mixture of steel and rubber piping. Once engaged (or disengaged) the position is verified by the free wheel sensor switch.
Fixing
This list should help you track down and the problem fault. Sometimes something simple, such as reversing a few metres helps dis-engagement with wheels straight helps too. If reversing doesnt solve the problem you probably have a problem that needs further investigation.
Basics
Check your fluids. Check the transfer box oil and front differential oil levels. Remove the top filler plug, both should be filled to the level of the bottom of the fill hole.
Any foul/burnt smell gritty texture indicates the oil is spent and an oil change is needed. Identify the correct oil from your manual. It is a good idea to change the fill and plug washers at the same time. On mine, when the diff gets hot oil leaks from the fill plug (another thing to add to my things to do list).
Tyres
Double check that all your tyres are the exactly same size and equal pressures. Slightly different tyre size / uneven wear may prevent correct engagement/dis-engagement.
Vacuum Solenoid Valves
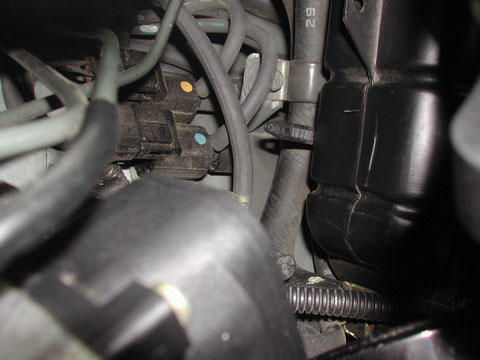
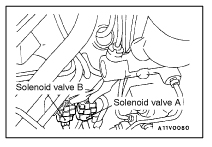
A solenoid valve is a fancy term for an electrically controlled valve, in this case controlling vacuum to the Front differential actuator. On RHD drive models, the vacuum control solenoids are mounted near the top of the inner wheel tub, near the master cylinder. Vacuum is needed both to open, and close the actuator. Each typically identified with a blob of paint, yellow and blue. (see picture).
Electronic signals from the transfer box, to the gearbox ECU govern the operation of solenoids that control the vacuum feed to open and close the actuator located on the front differential.
The vacuum line with yellow strip, just visible in picture, connects to the solenoid with yellow paint blob, and in turn connects to front differential actuator. Same with the blue striped hose connecting to the solenoid with the blue blob of paint.
- Check that both solenoids are not sticking and operate correctly.
- Check the electrical resistance, should be approx. 39/45 ohms (Haynes states 45 ohms)
- Check the harness connection, apply electrical contact cleaner to clean connectors
Mounted on the cross member, near the front differential is a vacuum storage vessel, or acculumator. It is about the size of a tin of baked beans. worth checking for leaks, rust, lose connections, etc.
If you are greeted with flashing lights upon start up the vacuum accumulator (can) is unable to hold a vacuum, leaking or damage. Repair or replace. Also check that the vacuum line non-return valve is not leaking, causing accumulator to leak into the plenum overnight (refer to vacuum schematic drawing).
Vacuum Solenoids - top of wheel tub near master cylinder
Actuator and shaft
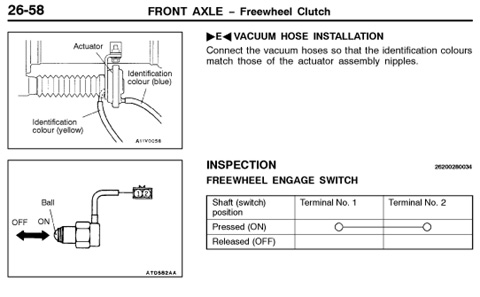
Mount on the front differential, the actuator and shaft (covered with rubber boot) should be clean and free. Grease the actuator shaft under the rubber boot - they can seize and give a permanent flashing lights.
The actuator is circular shape, about 50mm in diameter.
Find someone you trust, lie under the car with the engine running while the "trusted" driver moves the transfer gear box (t-case) lever in and out of 4wd - you should see the shaft move.
If it is not moving is probably seized from lack of use, carefully pull back the rubber boot and get some grease on the actuator rod. Try and slide it - it should move fairly easily if you jack a wheel and turn it a bit.
If the shaft still doesn't move freely, pull each vacuum connection, and test if one, or other is sucking! (wise to ensure that the person behind the wheel knows what they are doing! - handbrake applied and auto in Park of course).

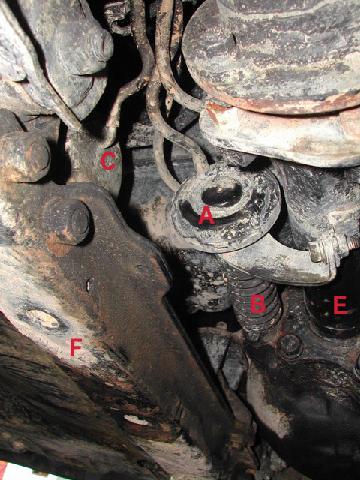
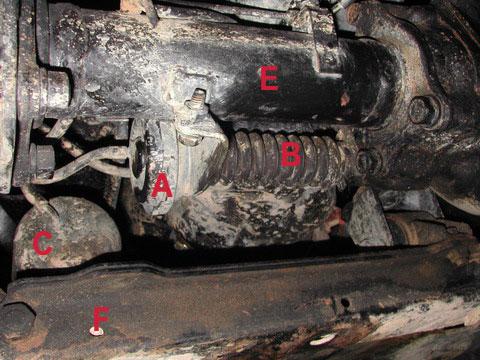
Key for images:
A - Actuator
B - Boot (covering actuator shaft)
C - Vacuum can (about the size of a tin of baked beans)
D - Differential (front)
E - Axle casing
F - Crossmember
Front Differential Actuator
Free Wheel Engage Switch
When change 2wd to 4wd and vice versa, the actuator moves the actuator shaft, and its position is monitored by the free wheel engage switch. If the actuator is moving and the shaft is free, then the next check is the free wheel engage switch. It either needs replacing or cleaning (bad connection). This is located above the actuator shaft and if you remove your bashplates can see it clearly.
To test continuity, whilst in 4wd, and igintion off, link across the connector. Upon restart if the flashing has stopped this confirms the wiring from the connector to the ecu is intact and the switch needs work (don't forget to remove the link and reinstate afterwards).
Key for images:
A - Actuator
B - Boot (covering actuator shaft)
C - Vacuum can (about the size of a tin of baked beans)
D - Differential (front)
E - Axle casing
F - Crossmember
Vacuum Piping
The vacuum piping comprises a combination of steel tube and rubber hoses bascially routed from the engine through the solenoid valves to the actuator. The piping might be leaking, disconnected or perished. Also it is easy to miss reconnecting if you have just done other work in that area (been there done that!). The non-return valve may also be faulty.
You need to make sure that all the vacuum piping and hoses , and all connections are good. And don't forget without a hand vacuum pump the engine needs to be running to create the vacuum.
To help trace any leakage:
- Inspect the piping it might be damaged, leaking, spilt, cut, missing or perished.
- Temporary swap over the vacuum hoses (yellow and blue stripe outlet from solenoid valves) if lights stop flashing, the fault is either yellow stripe or blue stripe tubing. Replace hoses to orginal position and track pipe leakage. A hand vacuum pump is really handy since a vacuum leak can be difficult to identify.
- Test for continuity/blockage of piping. use a hand vaccum pump if available or alternately blow through disconnected pipe with helper underneath.
If you identify a leak or disconnected pipe just reconnecting may not be sufficient to solve the problem since dust and dirt will have been sucked into the soleniod valve.
Vacuum piping schematic diagram (pdf)
Click here for vaccum piping schematic diagram (PDF format 1 page)
Front axle (viewed from the front, beneath the radiator)
Key for images:
A - Actuator
B - Boot (covering actuator shaft)
C - Vacuum can (about the size of a tin of baked beans)
D - Differential (front)
E - Axle casing
F - Crossmember
Automotive Hand Vacuum Pump

Very useful tool to check vacuum piping.
Centre Differential - Orange flashing light
The transfer box (t-case) houses the centre differential, permitting drive to both front and rear wheels. On the super select panel it is represented as the central orange colour lamp, it is labelled "C/D Lock"
The manual I have indicates that there is a switch connector, from the centre diff, with a yellow/blue wire (which then changes to brown/black) and connects to the 4x4 ECU. If you have different year, or a rear diff locker the wiring is a bit more complex.
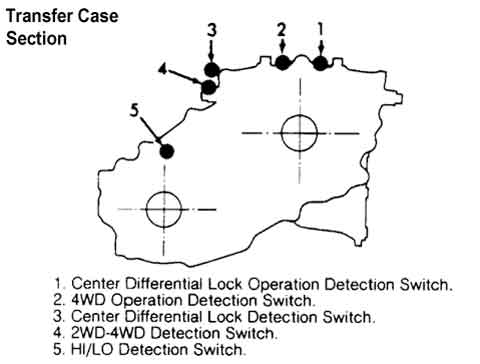
If you have the orange flashing light it is most probably an electrical issue with the centre differential detent switches on the transfer gear box (t/case), possibly a broken wire or fouled switch, could also be a poor connection due to mud/etc. There are five centre differential detent switches on the t/case for checking and inspection.
Vacuum Tank
If you lights flash furiously even before firing up your engine, it most likely a problem with the vacuum accumulator or the non-return valve (refer to piping). The acculumator is a small vacuum tank, to "store" or retain vacuum, it looks like a small tin can, about the size of a can of baked beans (the universal size guage) and it is located just behind the front differential with vaccum pipe connection.
Check the connection is secure, and tank itself is undamaged. Use hand vacuum pump if available to test for leakage.
On older models check for rust, if you are sure the tank is intact, perhaps add a coat of hammerite paint or equal. DONT paint or use any solvents until you are sure the can is sound, otherwise any weakness would allow contamination to be sucked into the vacuum system.
Transfer Gear box (t-case)
The wiring from the switches on the top of the transfer gearbox can perish/harden over time and have a tendency to break. Treat them with care! Check for wiring for clean connections, continuity and possible short circuit. Where possible clean connectors with electrical contact cleaner or equal.
transfer gearbox (t-case) sensor switches locations
A Wiring Diagram
I was asked for a wiring diagram, so there is link below. However, you have to be careful different models/years have different colour wiring!
click here for wiring diagram (appox 110k)
4WD ECU
Very rarely the 4WD Electronic Control Unit (ECU) located behind the dash is faulty. I'd re-check all above first, and try to swap with a known, working ECU to confirm the ECU fault before replacement $$$$
** READERS TIP
Double check if you anyone has been working on the radio, you might have accidently disconnected/dislodges the ECU connection.
Keywords: super select, flashing lights, pajero, vacuum, solenoids, wiring diagram, 4WD lights, 4x4 display, lights flashing pajero, shogun, challenger, mitisbushi, flashing light fix, active trak
Notes:
- Comments/improvements are welcome johnnospam@hknospamexpats.com, dont forget to remove the nospam
- Feel free to copy and distribute. However, I update this page with new info from time time, therefore best to link back to this page as it will be the lastest version.
- E&OE
cheers,
John
|

